data2check documentation – Checking an InDesign document
Table of contents
1. Creating a configuration
Under the menu option »Configuration« you can create configurations for checking InDesign documents (see figure 1).
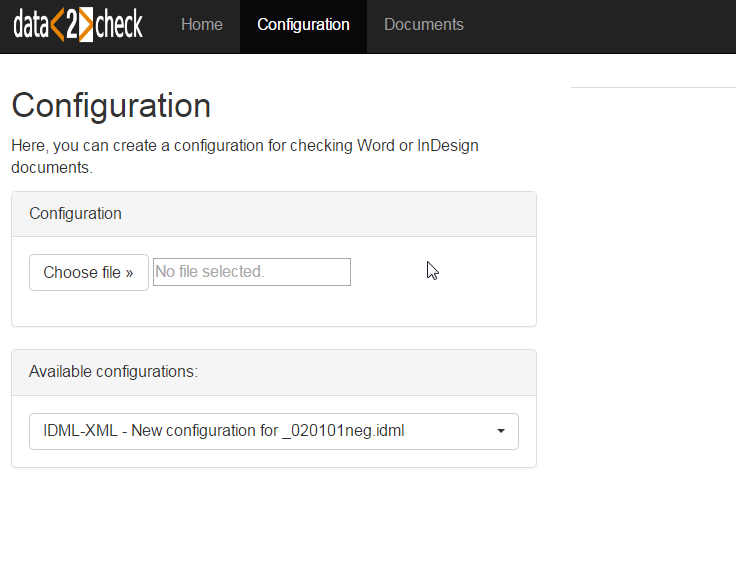
Figure 1: Creating a configuration for checking documents.
In order to be able to check a document according to your criteria, you must first create a configuration. Therefore, you need a template file (Adobe InDesign) in which all paragraph and character styles required for your project are included. This document serves as the basis for the configuration.
Here, you upload this template file and then create an appropriate configuration.
By clicking the »Choose file« button (see figure 2), your file manager opens where you select a template file (see figure 3). This file is the basis for the configuration which shall be created.
NOTICE: All formats of the files to be uploaded must be XML compatible. This means: please upload only files with the extension .idml for Adobe InDesign!
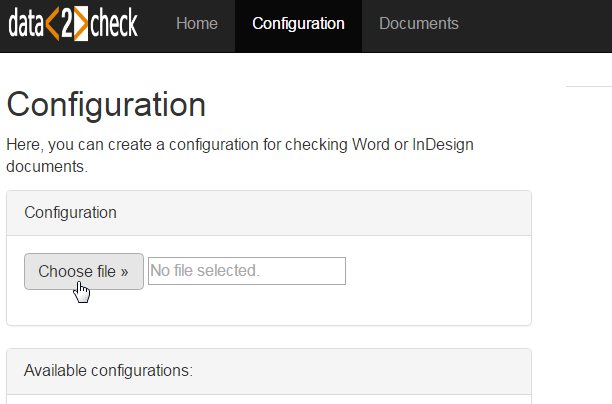
Figure 2: Upload of a template file - Step 1: Clicking »Choose file« to open the file manager.
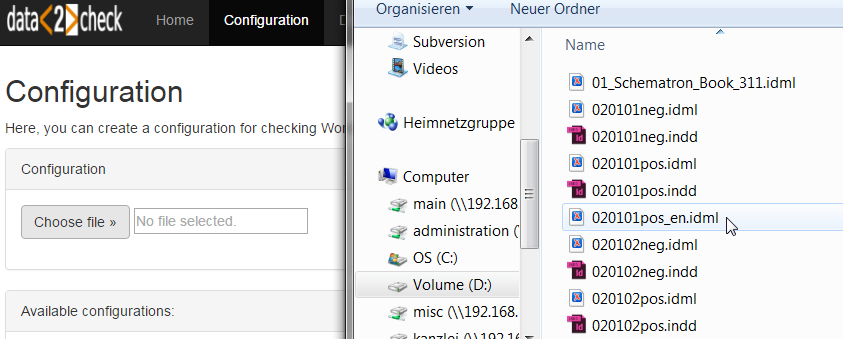
Figure 3: Upload of a template file - Step 2: Choosing an .idml file.
After selecting the file via double-click, the file name appears in the field next to the »Choose file« button (previously, »No file selected.« could be read here). Now click the green »Upload template file« button (see figure 4).
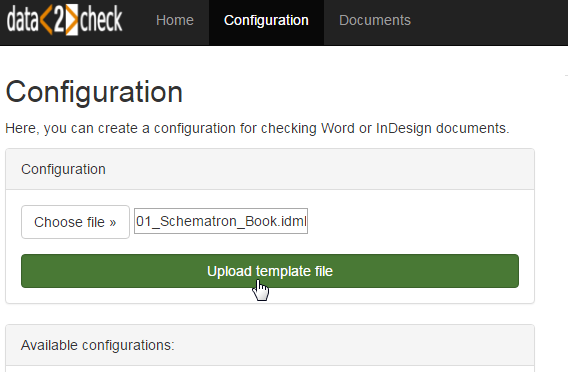
Figure 4: Upload of a template file - Step 3: Upload of the selected file.
During the upload of a file you will see a green bar displaying the progress of the upload (see figure 5). This process may take some seconds.
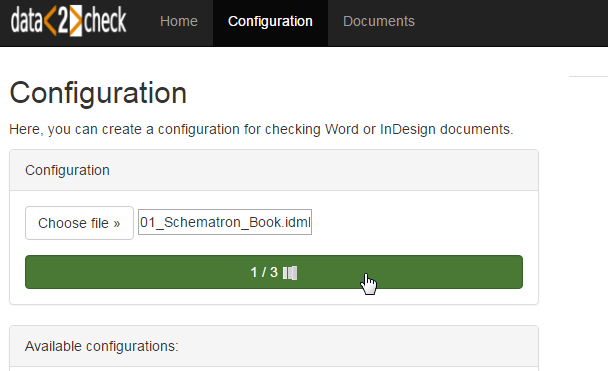
Figure 5: Green progress bar during the file upload.
After the successful upload of the template file, you get to the "Configuration Management" (right-hand side), where you have the possibility to edit your configuration(s) (see figure 6). For more details, see under 2. Editing a configuration.
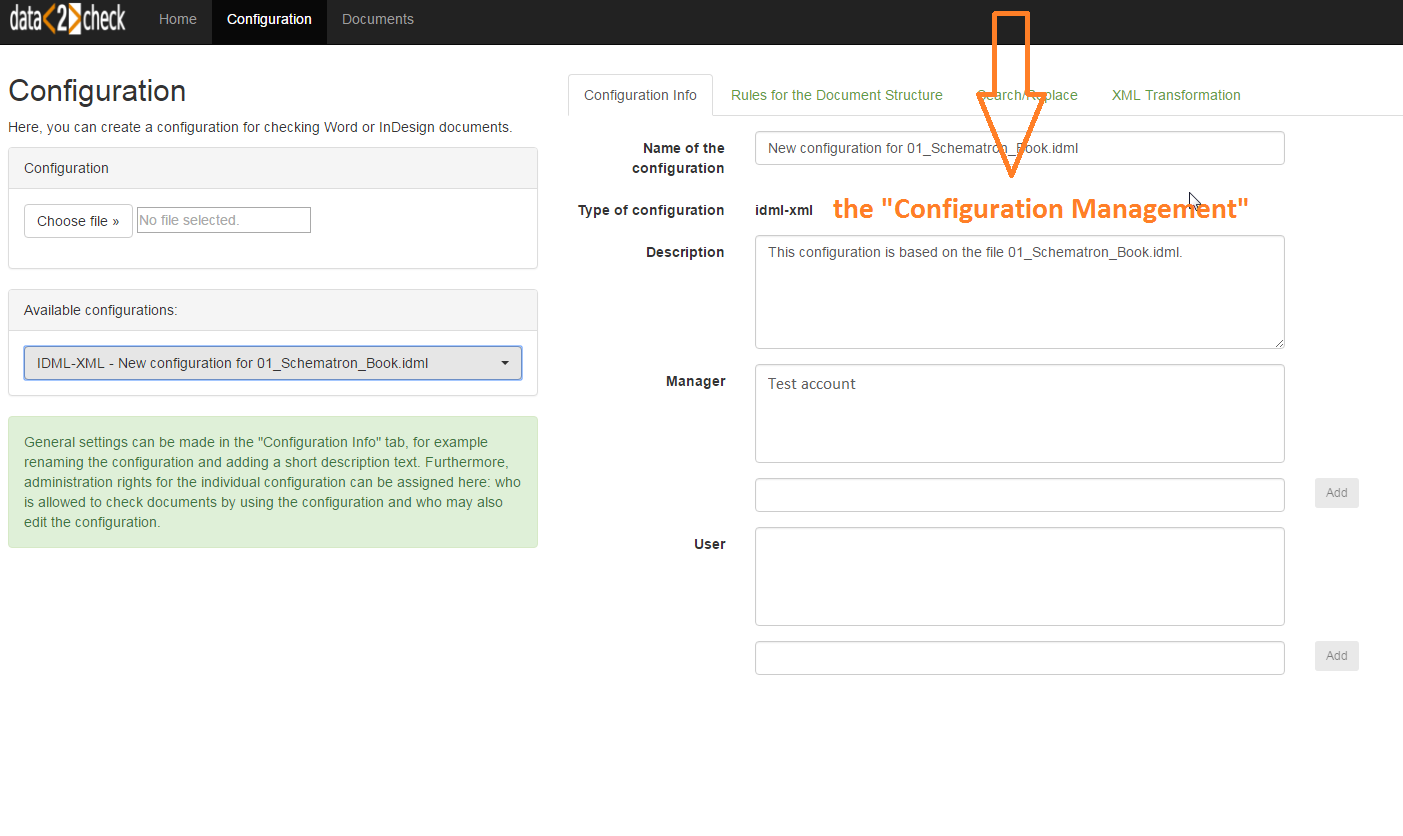
Figure 6: The Configuration Management.
nder »Available configurations:« (left-hand side) the individually available configurations are listed. In our example only one configuration is available: IDML-XML - New configuration for 020101pos.idml (see figure 7).
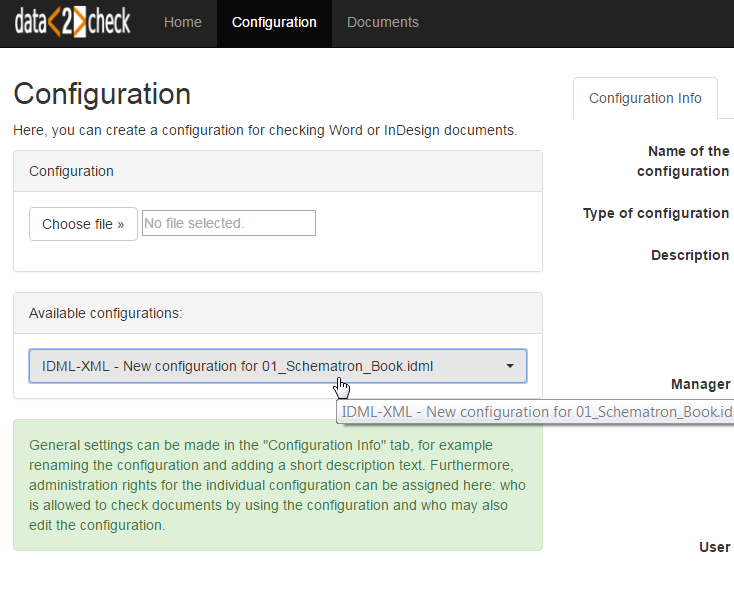
Figure 7: The available configuration after uploading the example template file.
In case you have already created several configurations, this dropdown list contains all of them; the latest (current) configuration appears at the bottom of the list, ticked with a check mark (see figure 8).
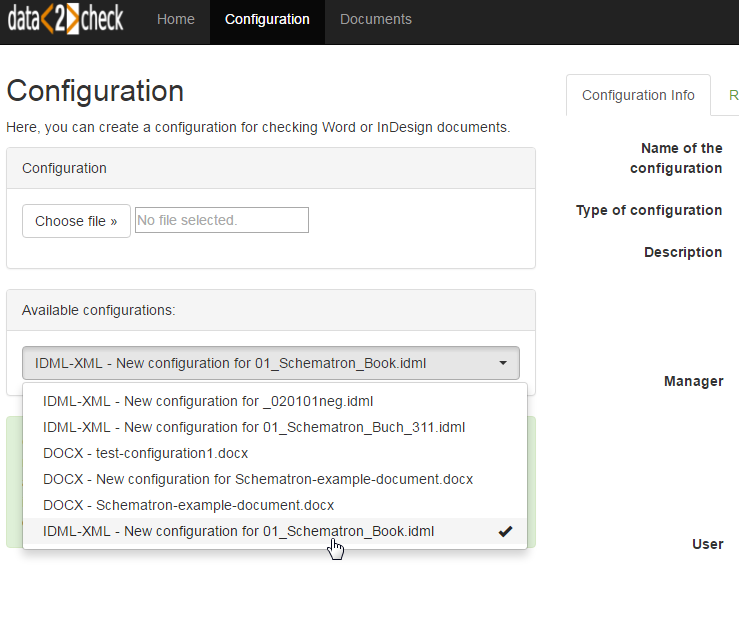
Figure 8: The current configuration can be recognized by the check mark.
The selected template file was successfully analyzed. Now, the newly created configuration can be edited.
The individual parts and options for editing a configuration are described in detail in the following.
2. Editing a configuration
Under the menu option »Configuration« a previously created configuration for checking documents can also be edited. This happens in the abovementioned "Configuration Management" (see figure 6).
The Configuration Management consists of the following tabs:
- Configuration Info
- Rules for the Document Structure
- Search Rules
- XML Transformation
Before you can adjust a configuration according to your requirements, you have to select one in the dropdown list under »Available configurations:« (left-hand side, see also figure 8).
2.1 The Configuration Info
In the Configuration Info tab under the menu option »Configuration« general settings for a configuration can be made (see figure 9).
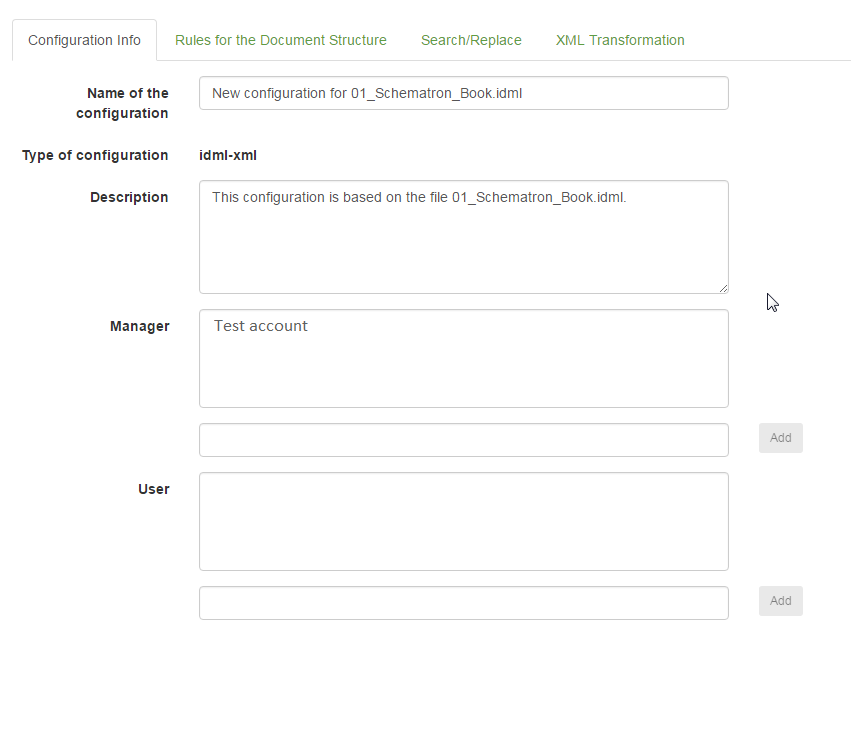
Figure 9: Possible settings in the »Configuration Info« tab.
Here, the created configuration can be renamed (input field »Name of the configuration«) and described in more detail (input field »Description«). On the one hand, this allows you to better assign a configuration to a project. On the other hand, the configuration can later be located more easily in case you want to create more than one configuration.
PLEASE NOTE: The default name of a newly created configuration consists of the words "New configuration for" plus the name of the uploaded file (including the file format). Per default, the input field »Description« contains the sentence "This configuration is based on the file [name of the template file].". You may delete the default texts in both input fields and also enter other texts (see figure 10).
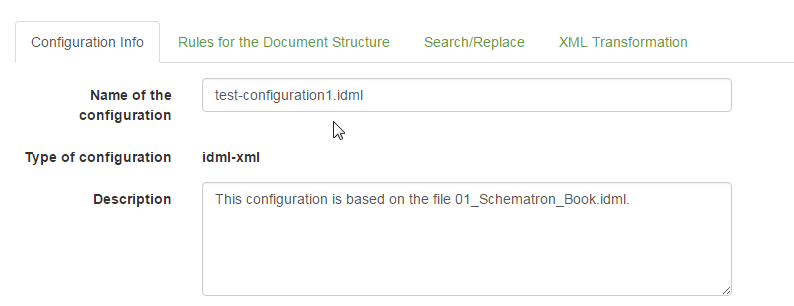
Figure 10: Changing the configuration name into "test-configuration1.idml".
TIP: In case you also create configurations for checking Microsoft Word documents, just leave the file extension .idml in the name of the InDesign configurations and vice versa in order to avoid confusion for documents with the same name.
Furthermore, the "group manager" has the right to add as well as to delete other users and managers. Users are only allowed to use the configuration for checking documents, whereas managers may also change settings of the configuration or delete it. Further information on the "group" concept of data2check can be found under General part: 2. Registration.
NOTICE: Please do not forget to save the configuration after making the general settings!
2.2 Saving and deleting a configuration
All the settings you have made should be saved by clicking the »Save configuration« button at the bottom of each tab.
NOTICE: Always save your configuration before checking a document or creating and editing a new one!
An existing configuration can be deleted by clicking the »Delete configuration« button (see figure 11).
NOTICE: As a consequence, the configuration, including all settings, is permanently deleted and must then be created and edited again in order to be able to reuse it in its original form!
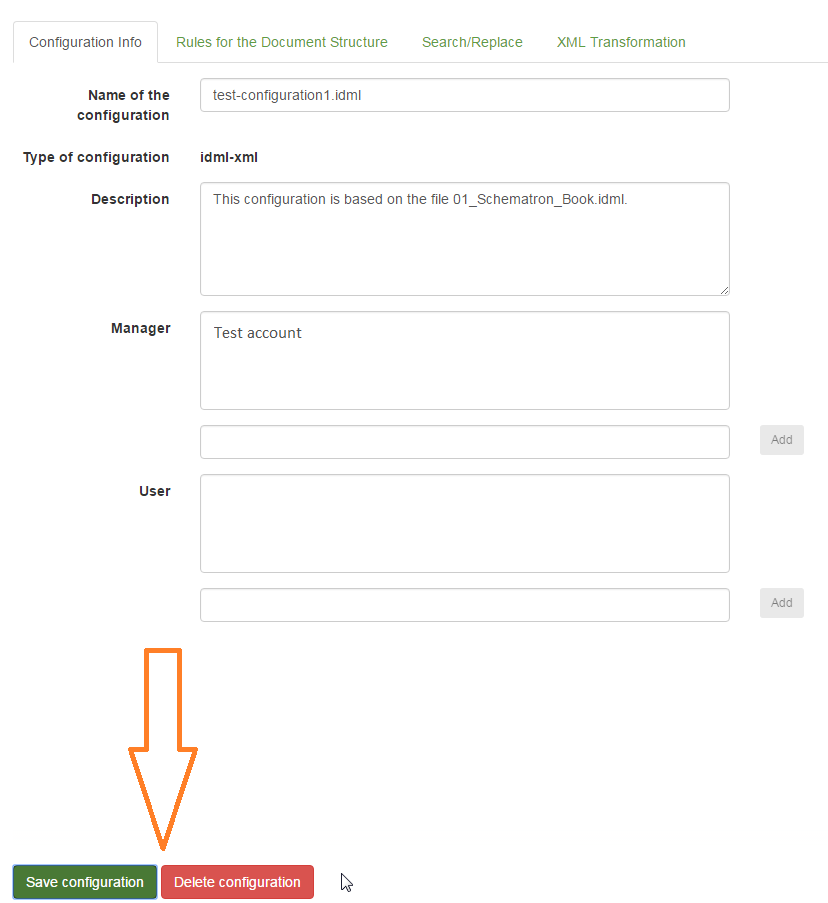
Figure 11: Saving or deleting a configuration.
2.3 Rules for the Document Structure
In the Rules for the Document Structure tab under the menu option »Configuration« all paragraph and character styles created in the InDesign template file are listed. Here, you can define rules for the handling of these styles in the document to be checked.
You can define for each paragraph style whether it has the status of a heading or of a normal paragraph.
Every single paragraph style created in the template file is listed individually with its setting options (see figure 12).
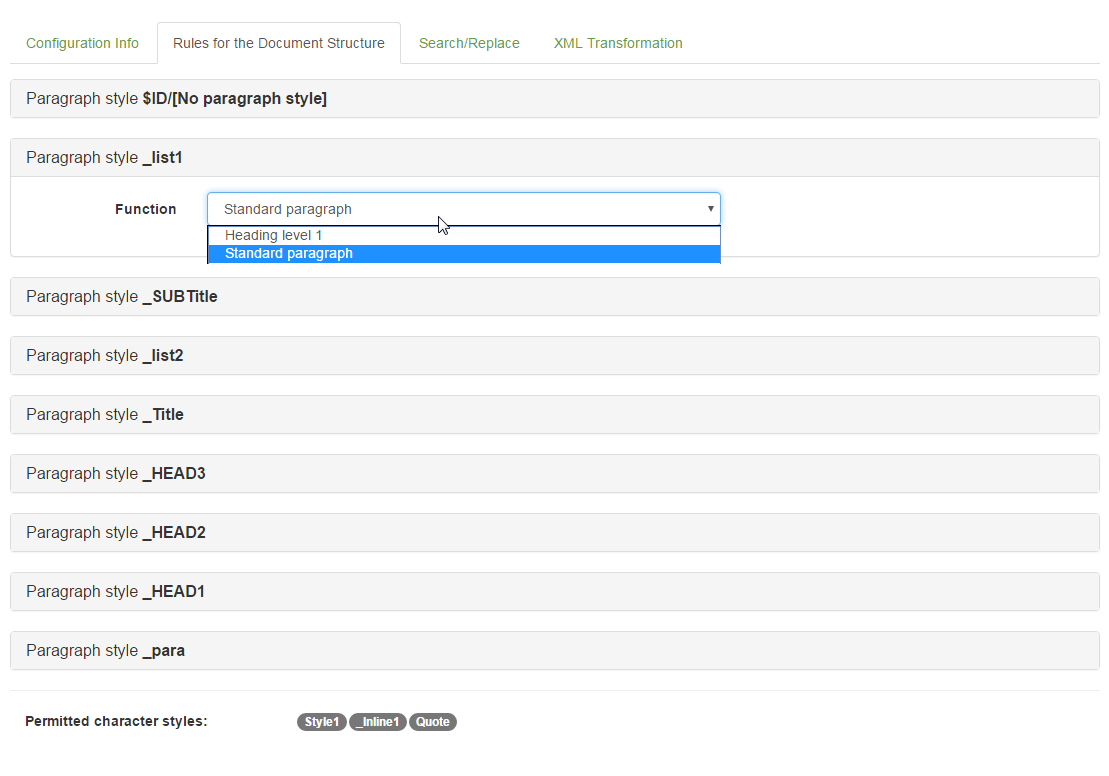
Figure 12: Paragraph styles in an InDesign configuration with the possible settings (exemplary presentation).
In the dropdown list next to »Function«, you can select the required setting for each paragraph style. In this list the names of the individual paragraph styles are highlighted in bold characters, for example "Paragraph style _list1". The following options are available:
- Standard: A normal paragraph without structuring function (p).
- Heading level 1: A headline with structuring function (h1).
NOTICE: The numbering of the heading level is growing constantly depending on which level has been previously selected for another paragraph style! (Example: »Heading level 2« was assigned for paragraph style A. As a result, apart from heading level 1 to 2, also level 3 can be assigned for paragraph style B, etc.)
For the sake of completeness, at the end of the tab (»Permitted character styles:«) all character styles created in the template file are listed under the paragraph styles just described (see figure 13).
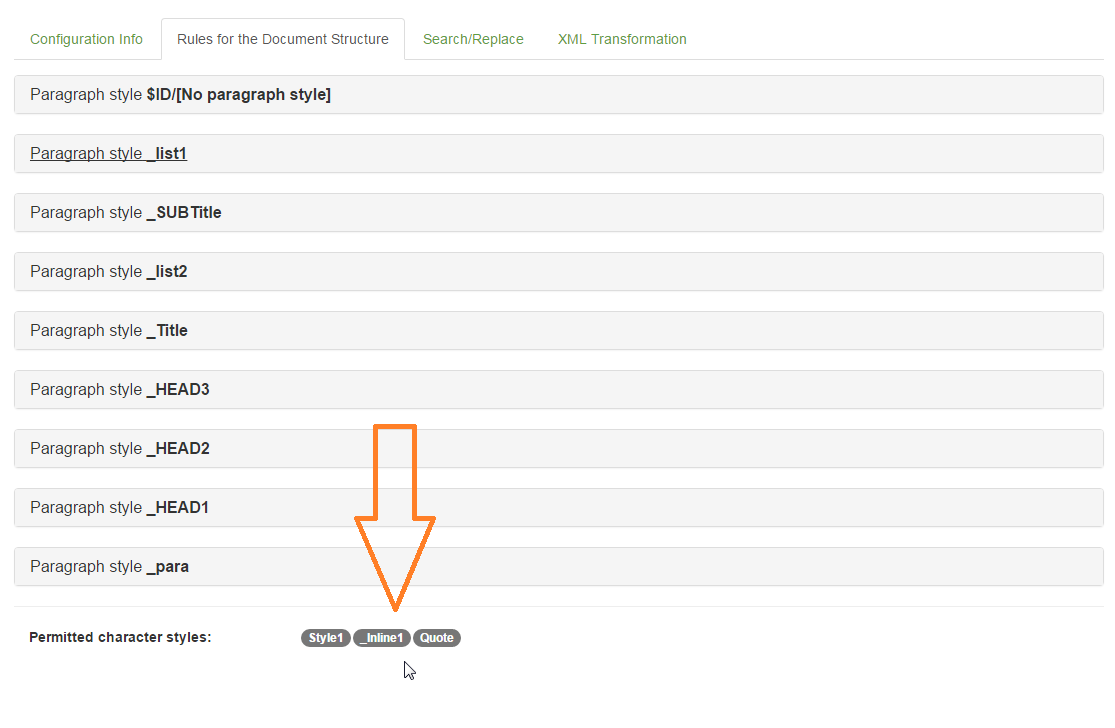
Figure 13: The character styles created in the template file (exemplary presentation).
NOTICE: Please do not forget to save the configuration after defining the rules for the paragraph styles!
2.4 Search Rules
In the Search Rules tab under the menu option »Configuration«, for micro-typographical purposes, you can create search rules for certain character combinations appearing in the document to be checked. In the InDesign output document, these character combinations will be marked via error messages (in the form of InDesign Notes). You can search for regular expressions and normal strings.
You can create any number of Search Rules for the document to be checked. Please click for each new rule the »Add a new rule« button (see figure 14).

Figure 14: Creating a new Search Rule.
Now, an input mask appears where you can enter your search term in the »Find« field (see figure 15).

Figure 15: Entering a search term (Notice: please use only valid characters!).
TIP: You may search for single words, (several) space characters, letter combinations (for example EUR), abbreviations (for example e.g.), groups of words and also for whole sentences. Breaks, however, can only be included in the search in the form of regular expressions.
NOTICE: By no means, the »Find« field should be left empty since the configuration becomes invalid and cannot be saved anymore! If you change your mind and decide you do not want to create a Search Rule for the configuration, please click the small x on the right side of the input mask in order to delete the rule (see figure 16).

Figure 16: Deleting a Search Rule.
Optionally, you can activate the »Regular expression« checkbox if you wish that the search string shall be interpreted as a regular expression (see figure 17).

Figure 17: Treating the search term as a regular expression.
You may also enter a comment in the »Comment for application of the rule« field on the right-hand side (see figure 18) if you wish that an own error message in the form of a Note is inserted wherever the search string is found in the InDesign output document (see figure 19).

Figure 18: Entering an individual comment for the Search Rule.
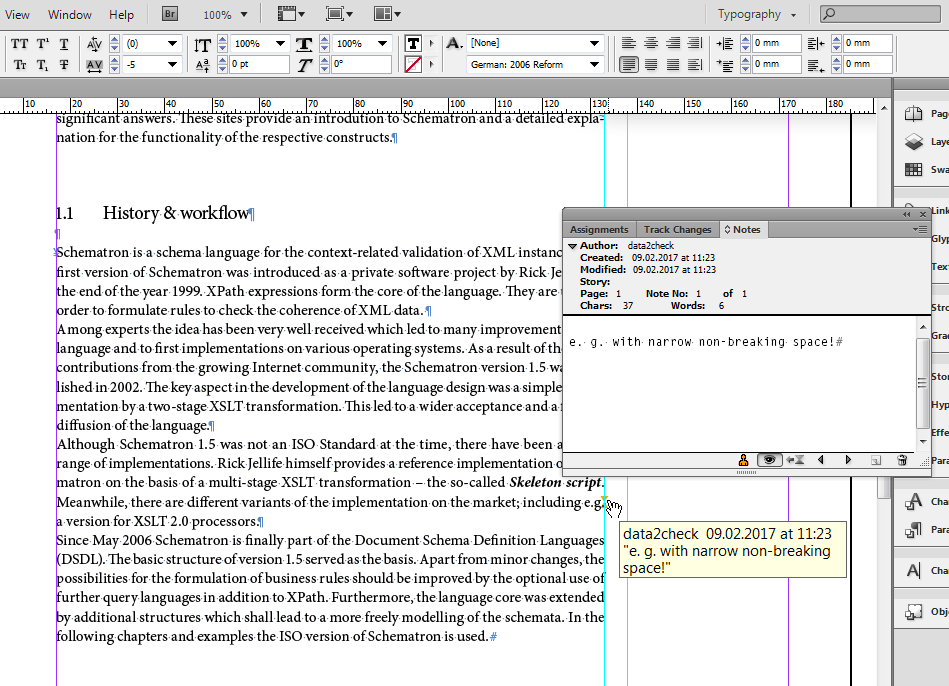
Figure 19: Comment (Note) on the Search Rule in the InDesign output document.
NOTICE: Please do not forget to save the configuration after creating a new Search Rule!
2.5 XML Transformation
In the XML Transformation tab under the menu option »Configuration« the structure of the automatically generated XML document can be adapted. This XML document is generated when checking a document and appears among the check results (XML version of the document, see figure 20).
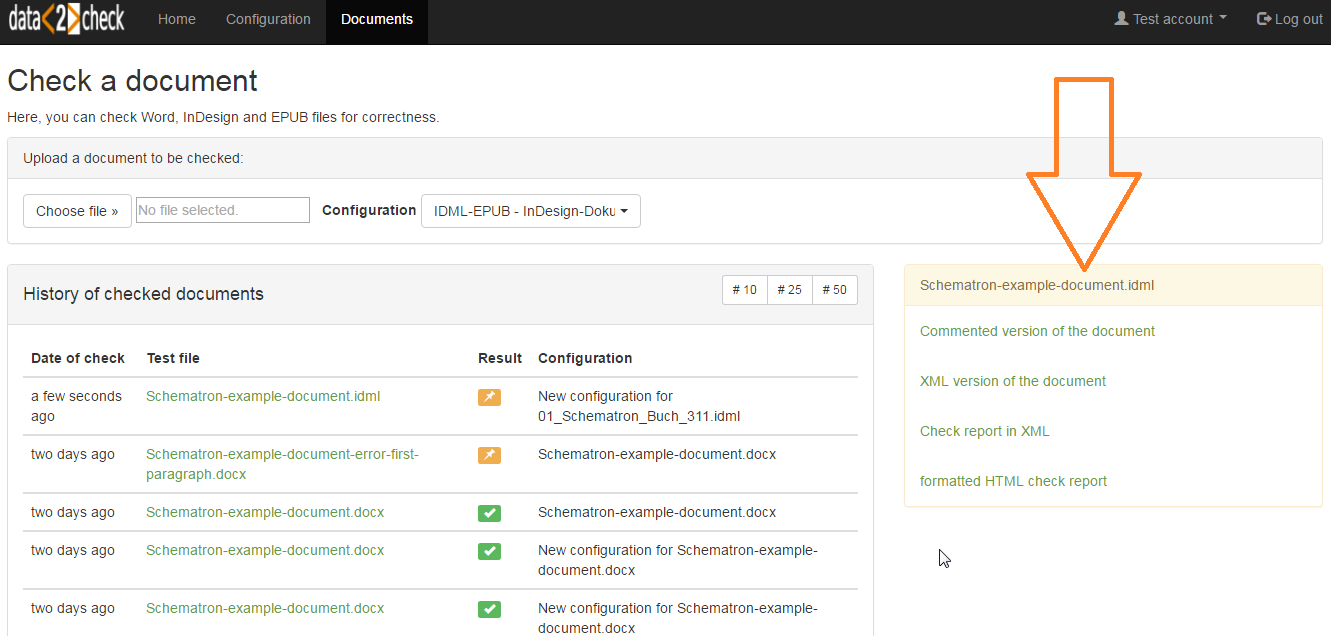
Figure 20: Listing of the check results after a successful document check.
All paragraph and character styles created in the InDesign template file as well as the root element are transformed into XML elements. Here, these elements can be renamed as well as, in part, deleted and unwrapped. The result of this transformation is a "raw XML" which may serve as a basis for further processing the document to other output formats, as for example HTML and EPUB.
2.5.1 The root element
The root element is automatically generated and appears first in the element list. By clicking the dropdown list you can select the »Rename« action and give the element a different name. Then, an input field appears where you can enter the new element name.
NOTICE: The »New element name« field must not be empty. The entry must start with a letter or an underscore, otherwise it is invalid and the configuration cannot be saved (see figure 21).
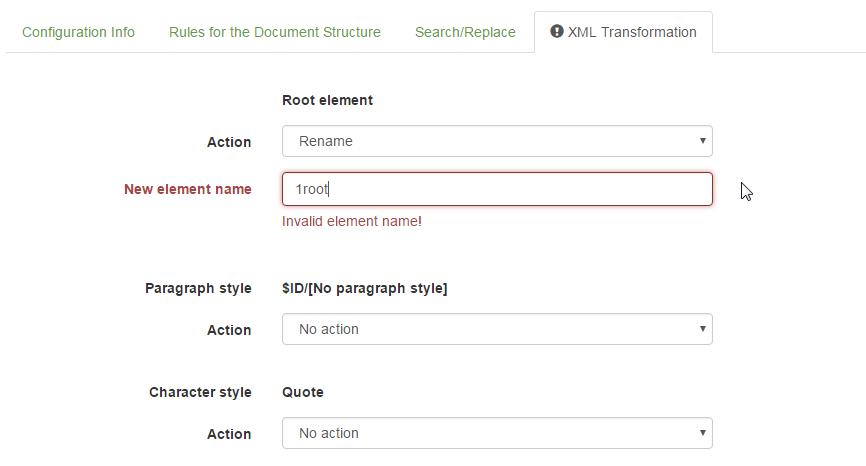
Figure 21: An invalid element name.
Please select »No action« if the root element shall not be renamed in the XML document.
2.5.2 The paragraph and character styles
After the root element the names of the paragraph and character styles created in the InDesign template file are listed in alphabetical order. Each style corresponds to a same named element in the automatically generated XML output file. The following actions are available (see figure 22):
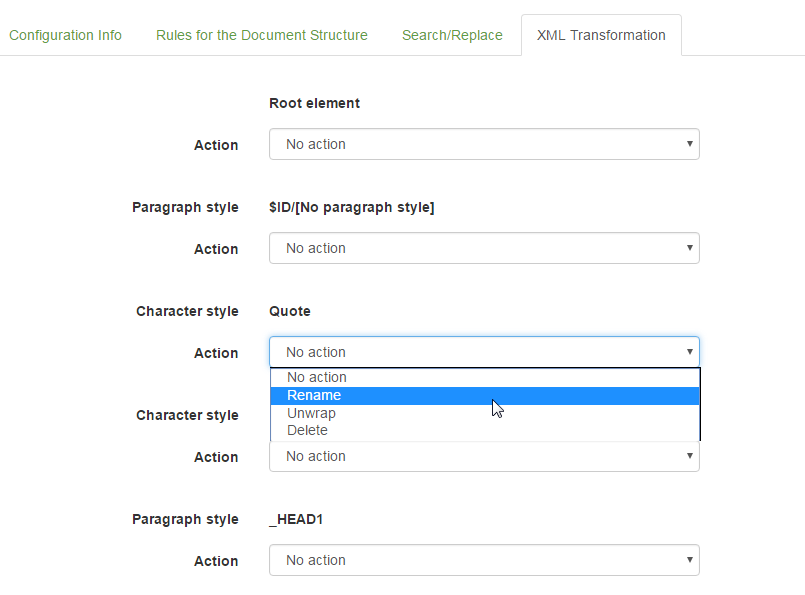
Figure 22: Renaming, unwrapping or deleting an element.
- No action: The element is not changed in the XML document.
- Rename: The element is renamed in the XML document.
- Unwrap: The element is resolved in the XML document, but the textual content is maintained.
- Delete: The element including its content is deleted in the XML document.
NOTICE: For the renaming of the paragraph and character styles the same rules apply as for the renaming of the root element (see figure 21)!
2.5.3 Generating a parent element
For the structuring of the automatically generated XML document a further feature is available: a so-called "container element" can be generated in order to, for example, create chapter structures. For this purpose, the following steps must be carried out:
- In the Rules for the Document Structure tab under the menu option »Configuration« (see under 2.3 Rules for the Document Structure) you give a paragraph style the status of a heading (Function -> Heading level 1, etc.) or you have already done so.
- Then, you can generate a parent element for this paragraph style in the XML Transformation tab by selecting the »Rename« action. Now, under the »New element name« input field the checkbox »Surround with a container element« appears next to the respective paragraph style.
- By activating this checkbox, the »Surrounding element« input field appears where you can enter the name of the new element (see figure 23).
NOTICE: For the naming of the container element the same rules apply as for the renaming of the root element (see figure 21)!
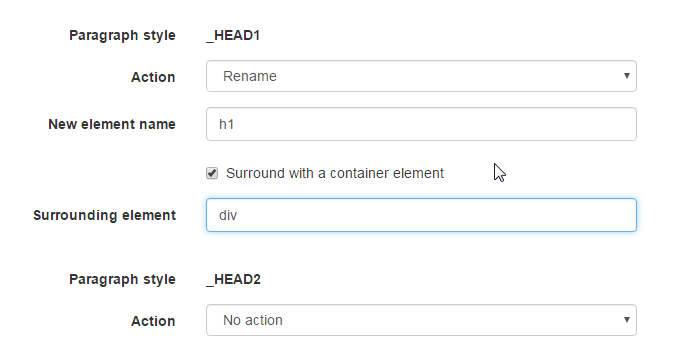
Figure 23: A parent element can be generated for an element with the status of a heading.
NOTICE: Please do not forget to save the configuration after adapting the elements for the XML transformation!
Now that you have edited your configuration, you can upload your InDesign documents under the menu option »Documents« and check them on the basis of your configuration. How to check a document is described in detail in the following.
3. Checking a document
Under the menu option »Documents« you can check InDesign documents with the help of a previously created configuration (see under 1. Creating a configuration and 2. Editing a configuration). After completion of a check, several output documents are available which can be viewed and further processed. These include a commented version of the checked document, an automatically generated XML document as well as an HTML check report (for futher informationen see under 3.2 The output documents).
3.1 The checking process
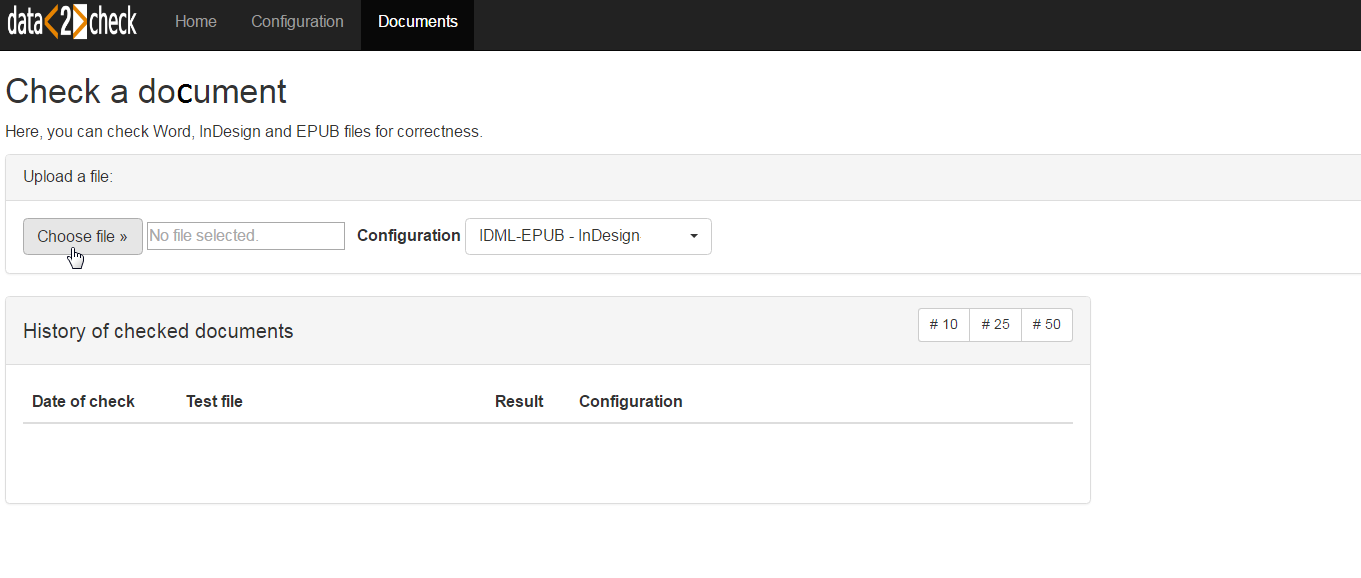
By clicking the »Choose file« button (see figure 24), your file manager opens, where you can select a document to be checked (see figure 25).
NOTICE: All formats of the files to be uploaded must be XML compatible. This means: please upload only files with the extension .idml for Adobe InDesign!
 >
>
Figure 24: Upload of a document to be checked - Step 1: Clicking »Choose file« to open the file manager.
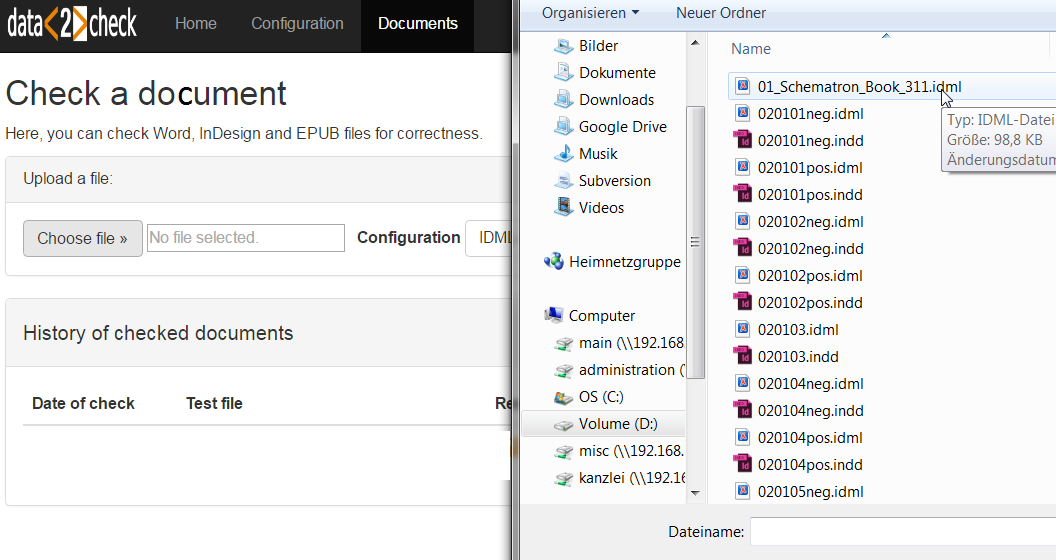
Figure 25: Upload of a document to be checked - Step 2: Choosing an .idml file.
After selecting a document to be checked via double-click, all configurations for InDesign already created appear in the dropdown list next to »Choose configuration«. The most recently created configuration always appears at the bottom of the list. Please select the configuration on the basis of which the previously selected document shall be checked (see figure 26).
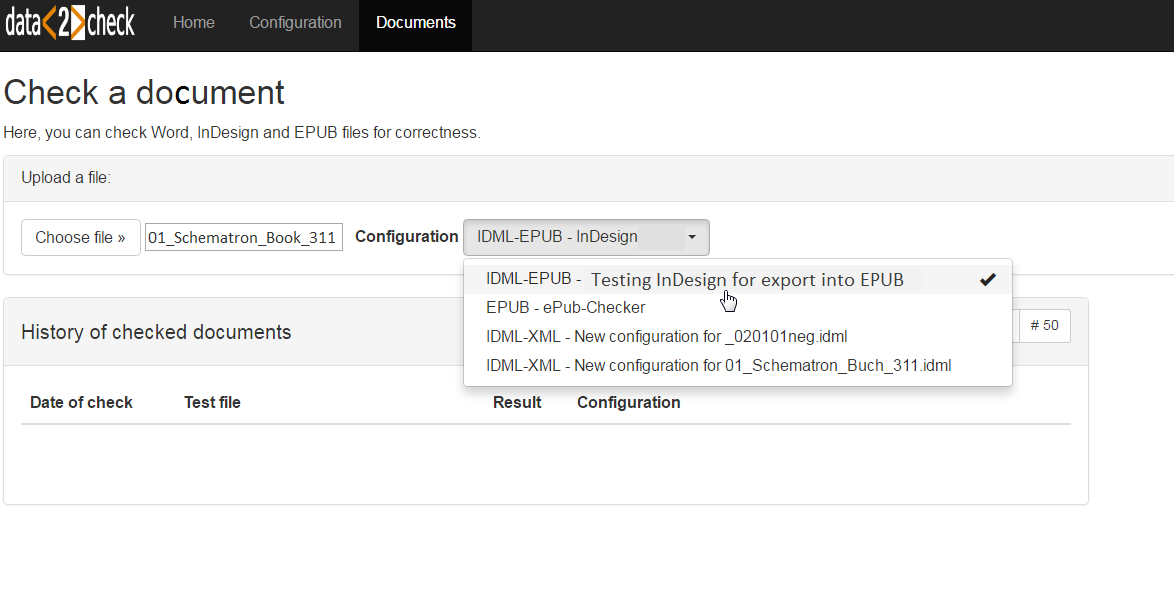
Figure 26: Available configurations after selecting an InDesign file (exemplary presentation).
After selecting the document to be checked and the appropriate configuration, please click the green »Upload file and start a check« button in order to start the checking process. Now, you will see a clock symbol which displays the progress of the check. This process may take some seconds (see figure 27).
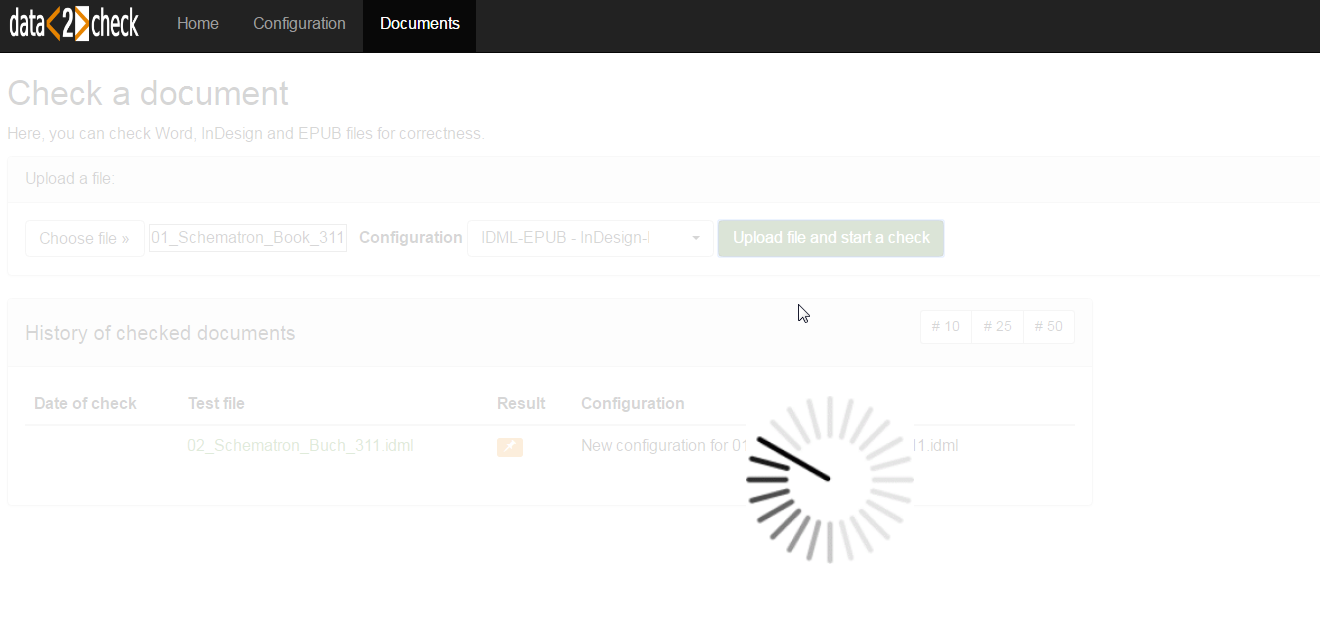
Figure 27: The check of the InDesign document is in progress.
The document selected by you was successfully checked. After completion of the check, you can see the output documents on the ride-hand side (see figure 20).
Further information on the individual output documents can be found in detail in the following.
3.2 The output documents
Irrespective of whether a check was "successful" (no errors found) or "not successful" (errors found), always four output documents are displayed in the form of links:
-
Commented version of the document: By following this link, an InDesign output document is downloaded. This exact copy of your uploaded document to be checked contains "comments" on the errors found at the relevant paragraph. These comments are composed as follows:
-
The Notes feature of InDesign in order to mark the spot where the error occured including a description of the error in the respective Note (see figure 28).
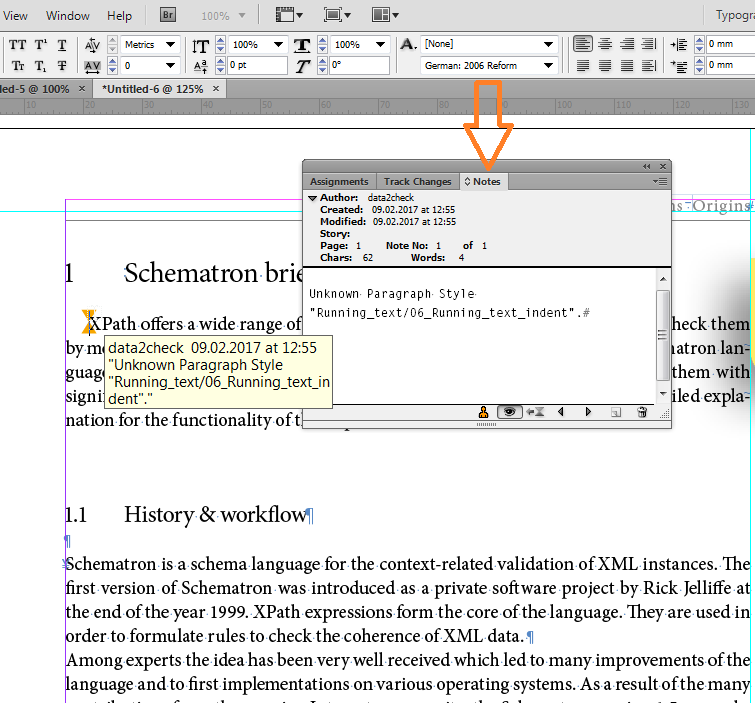
Figure 28: InDesign Note for an error message.
-
Summary error reports per text frame or other page objects in the form of new text frames (yellow background colour) lying at a non-printable layer (see figure 29). The numbers in the round brackets indicate the frequency of occurence of the individual error.
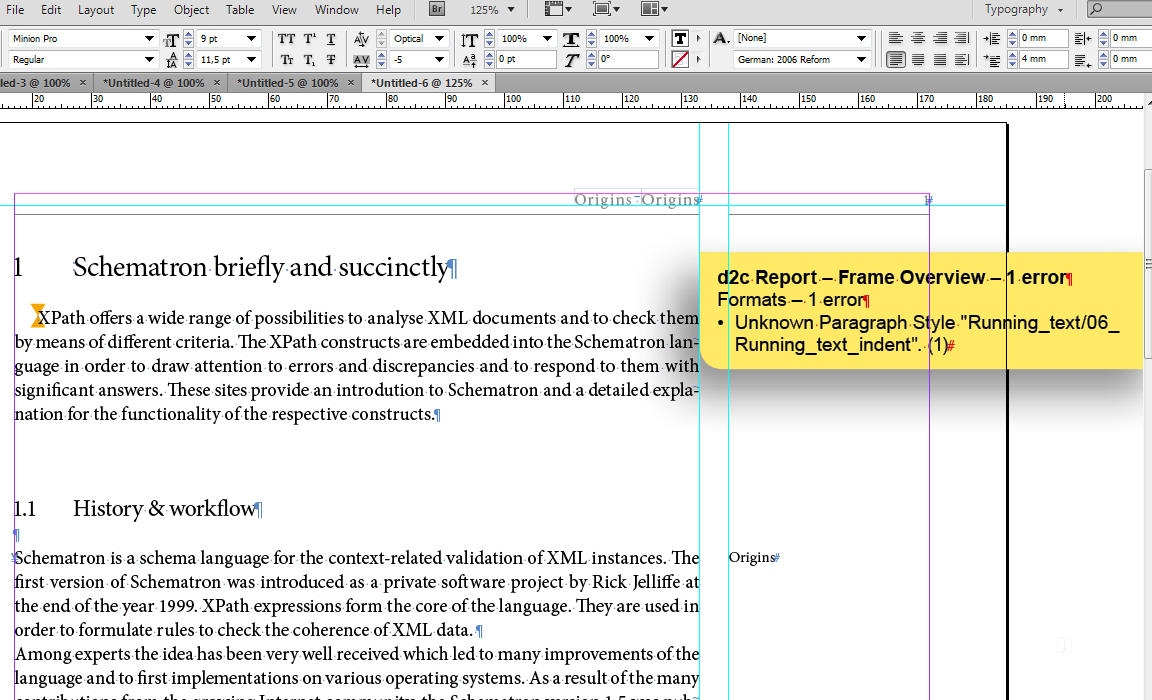
Figure 29: Frame overview with listing of errors.
-
One summary report for the whole document on the first page in the form of a new text frame (yellow background colour) lying at a non-printable layer (see figure 30). The numbers in the round brackets indicate the frequency of occurence of the individual error.
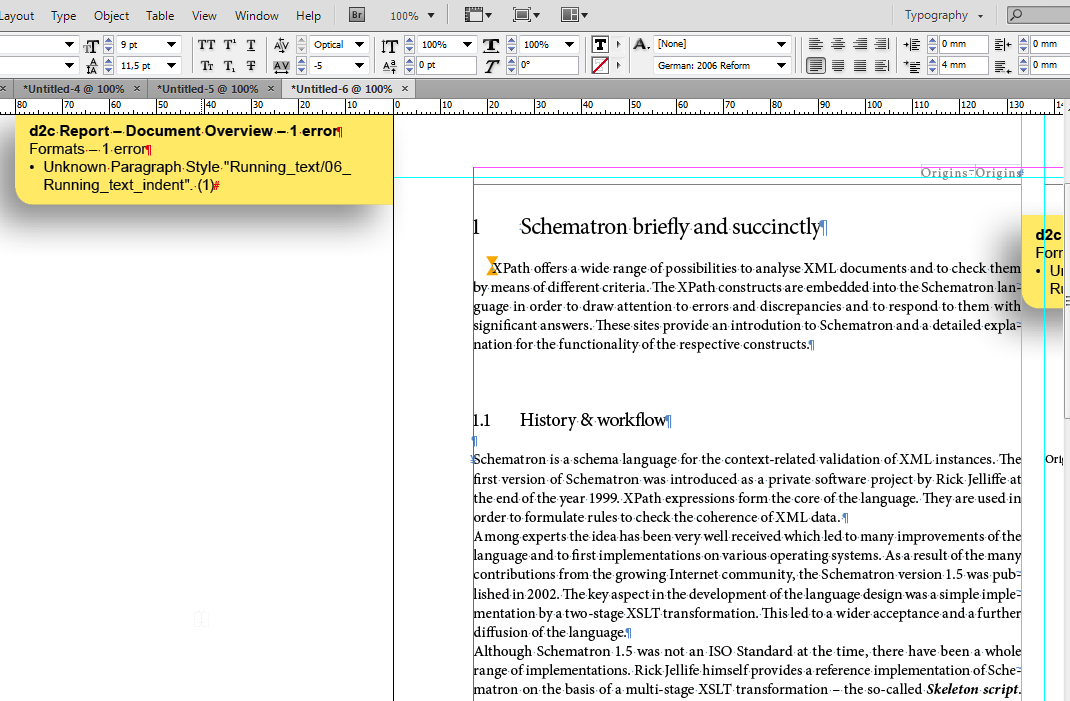
Figure 30: Document overview with complete listing of errors.
With the help of this commented version you can directly view any formatting errors in the InDesign document, correct them and then, where appropriate, upload the corrected document again for a new check.
-
-
XML version of the document: By following this link, an automatically generated XML document is downloaded. In this XML version of your document to be checked all paragraph and character styles were transformed into XML elements (see figure 31). These elements could be edited in advance in the XML Transformation tab under the menu option »Configuration« (see under 2.5 XML Transformation). This "raw XML" may serve as a basis for further processing into other output formats, as for example HTML, EPUB, etc.
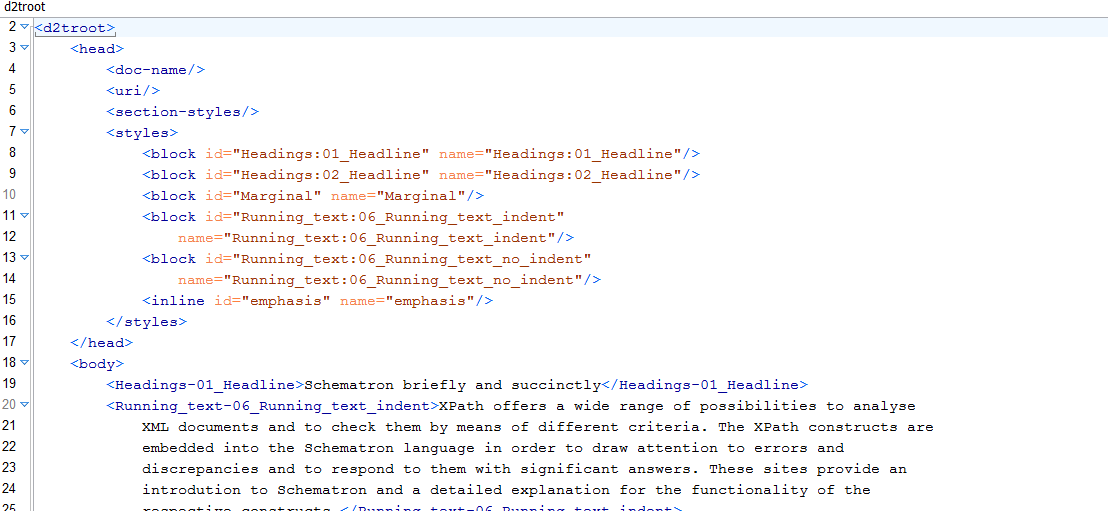
Figure 31: The XML version of the document to be checked (excerpt).
-
formatted check report: By following this link, a summary containing the errors as well as the error messages is downloaded as HTML (see figure 32). With the help of this check report you gain an initial overview of the extent and seriousness of the errors in the InDesign document.
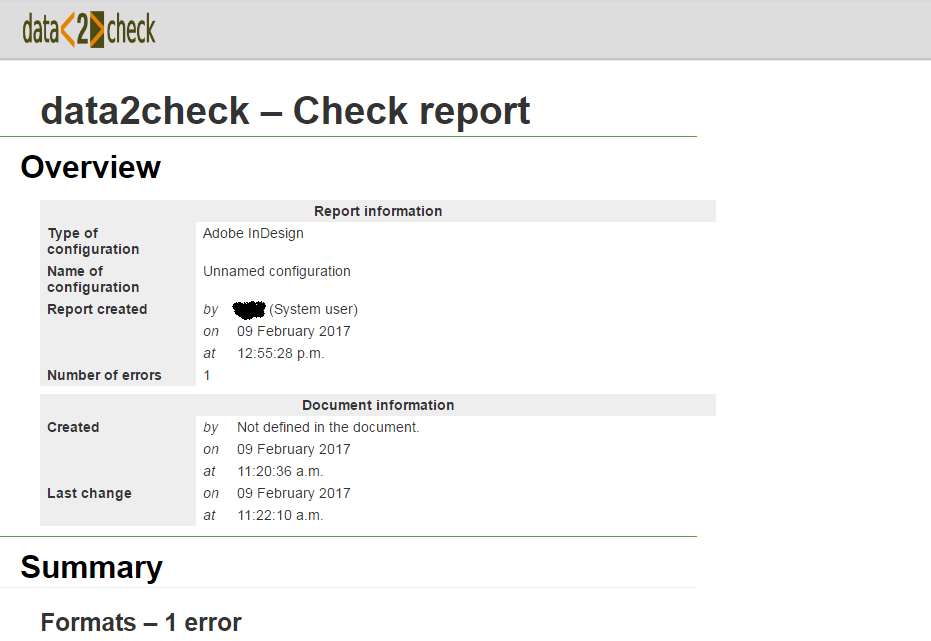
Figure 32: The formatted check report in HTML (excerpt).
In addition, you can directly see the errors found with the help of a browser preview. By clicking the »Details« section, all errors are listed and can be directly reviewed in the HTML version of your document when following the [Preview] link at the end of each list point (see figure 33).
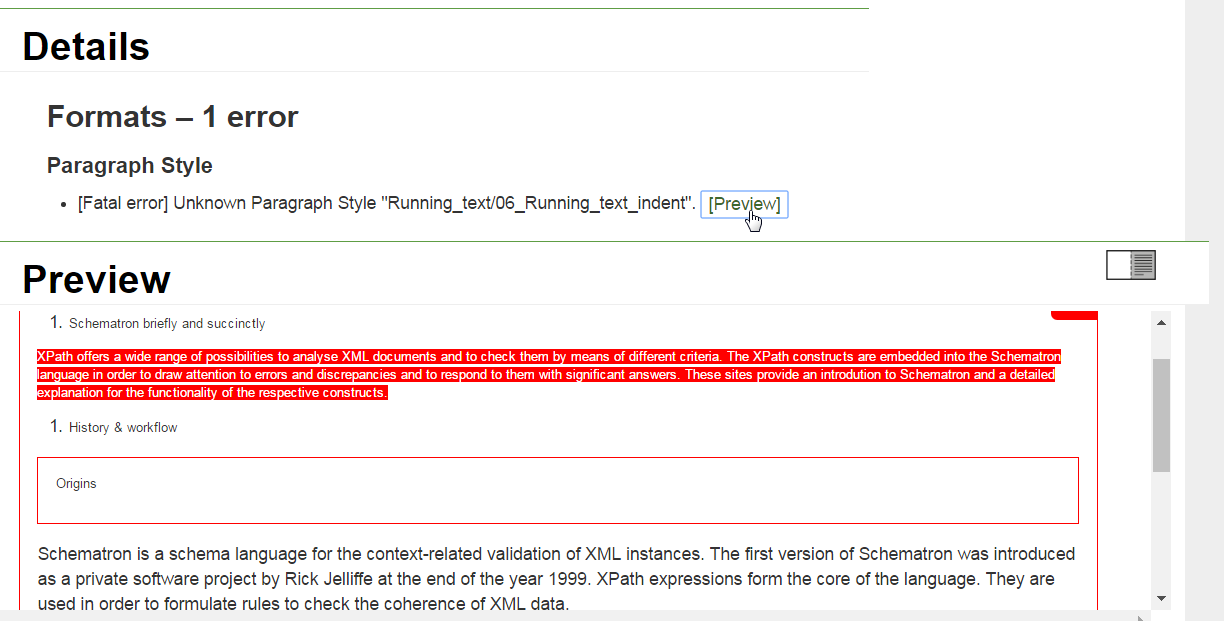
Figure 33: The preview feature in the formatted check report.
-
Check report in XML: By following this link, a check report in the SVRL (Schematron Validation Report Language) format is downloaded (see figure 34). This report can be used for further processing with XSLT or XPath.
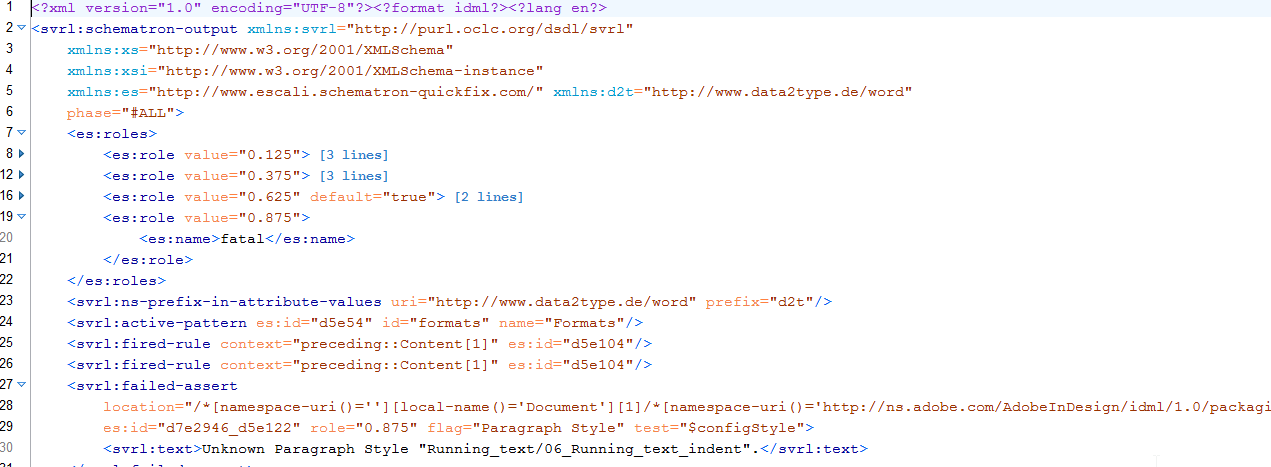
Figure 34: The SVRL check report (excerpt).
4. The history of checked documents
In the History of checked documents under the menu option »Documents« (left-hand side) all checks already carried out are listed in chronological order and access to the individual check results is granted. Therefore, the History of checked documents represents your personal database.
In this table all previous checks are listed including the time of the check (»Date
of check«), the name of the file to be checked (»Test file«), the result of the check
(green check icon (![]() ) for "successful check and no errors found", orange pin (
) for "successful check and no errors found", orange pin (![]() ) for "successful check but errors found" and red flash (
) for "successful check but errors found" and red flash (![]() ) for "check has failed, e.g. due to a system error") as well as the configuration
used for the individual check (see figure 35).
) for "check has failed, e.g. due to a system error") as well as the configuration
used for the individual check (see figure 35).
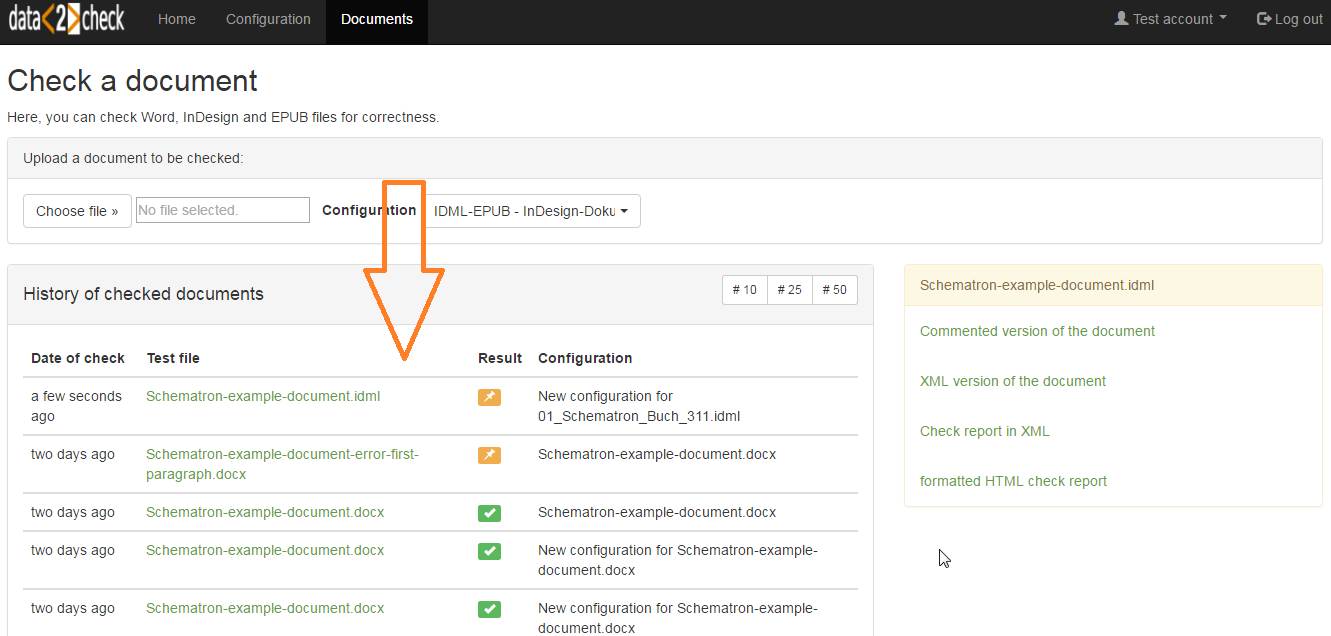
Figure 35: The History of checked documents.
By clicking one of the documents linked under »Test file«, the appropriate output documents appear on the right-hand side and can be viewed as described under 3.2 The output documents (see figure 36).
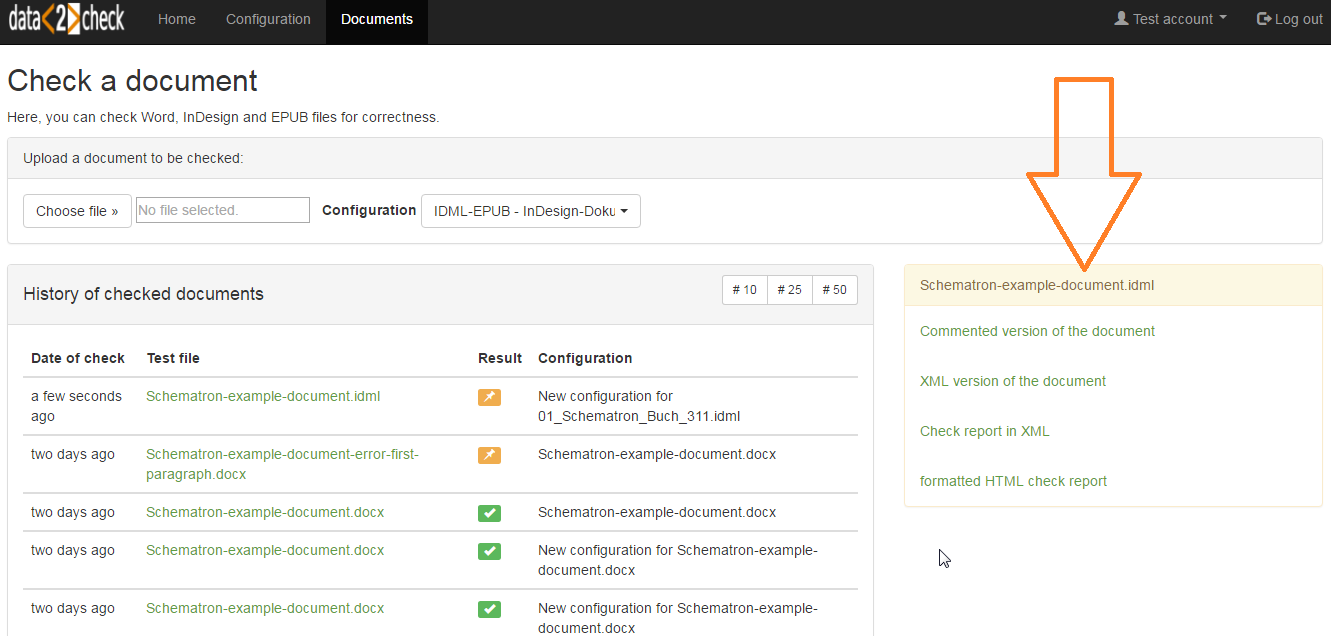
Figure 36: Listing of the output documents on the right-hand side.
Your History of checked documents can also be found on the data2check start page under the menu option »Home« (see under 4.1 Home in the general part of this help).